In day 22, we executed a contract deployment. In this guide, we will actually operate the deployed contract to confirm that it has been deployed correctly.
Checking Deployment Results
To check the deployment results, you will need the following.
- Local Network: This is a local network environment provided by Hardhat. It becomes available for use immediately after executing a Hardhat command. To view the information on this network from a digital wallet, set up a local net-oriented RPC node in Metamask.
- Digital Wallet (Metamask): The local net provides pseudo accounts. To check the ETH balance of each account, import the account information into the digital wallet. This allows you to see how the ETH balance changes as a result of each operation.
- Verification Script: A script to call functions of the developed contract, which can be executed from Hardhat. Taking the Funding contract as an example, it’s for executing functions like fund (investment) or withdraw (withdrawal).
Setting Up the Local Environment for Verification
First, prepare the verification environment by setting up items 1 and 2 mentioned above.
Setting Up RPC Node for Local Net
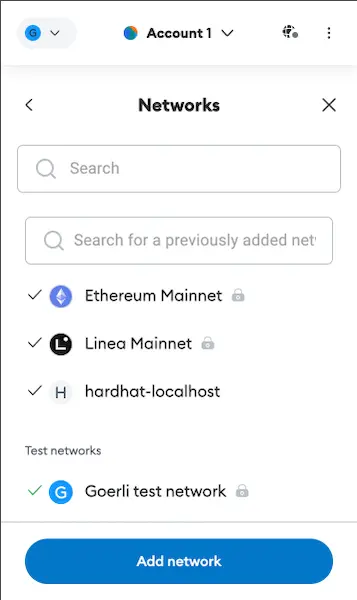
From the Metamask plugin of the browser you are using, select Settings > Networks > Add Network in order.
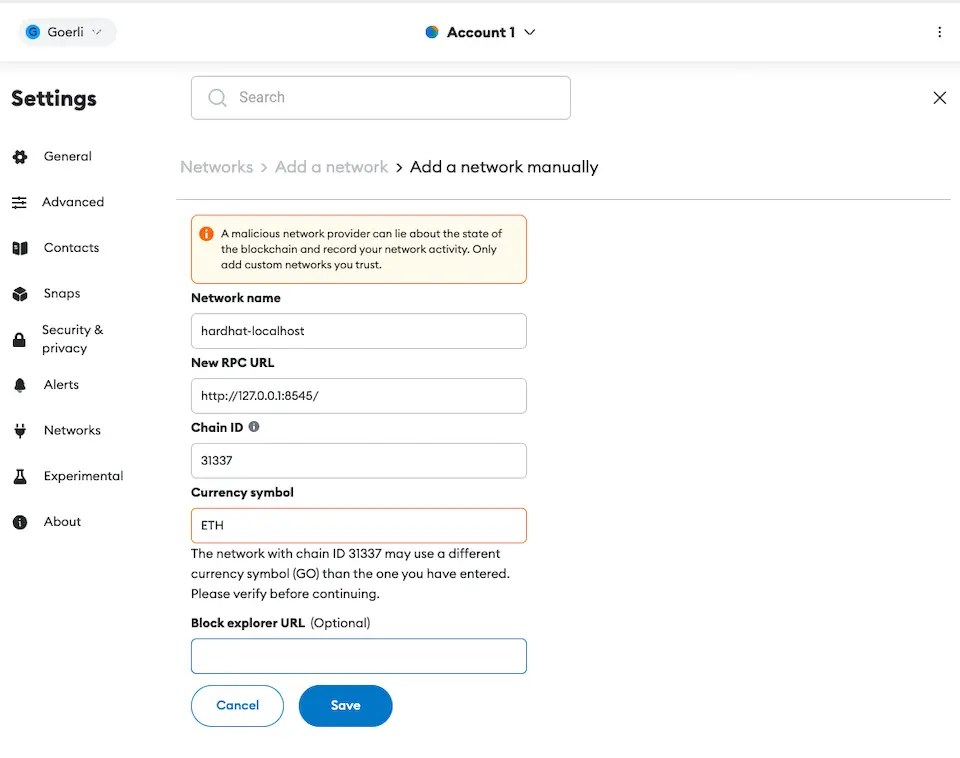
Next, choose to add a network manually in the displayed screen and enter information like in the following image. These are the RPC node settings for the local net. The URL is the RPC node URL of the local net, and the Chain ID is also for the local net.
Launching the Local Net
The local net is provided by Hardhat. Running the following command format on the console will launch it.
% yarn hardhat nodeImporting Account Information of the localnet
When you start the local net, multiple accounts are automatically set up as shown in the following image. Since there is no way to view these accounts as is, they need to be made visible in Metamask.
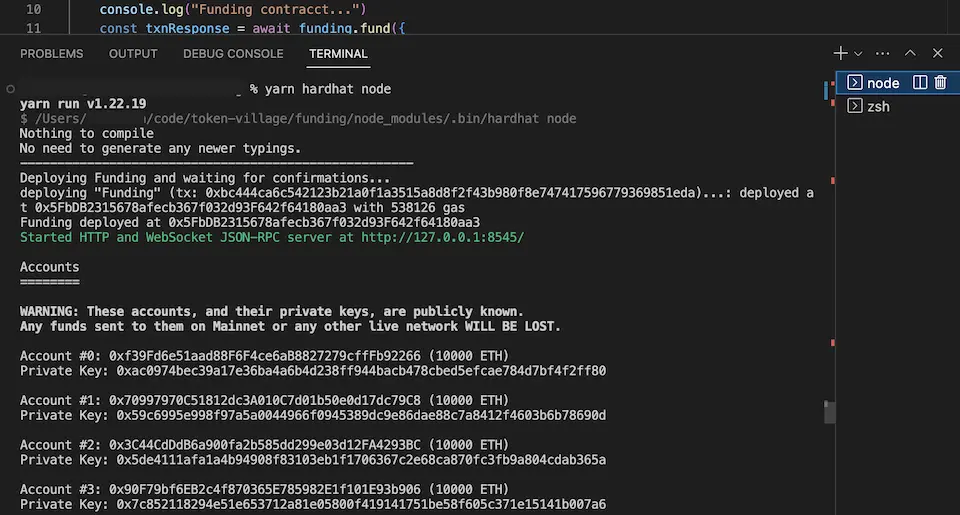
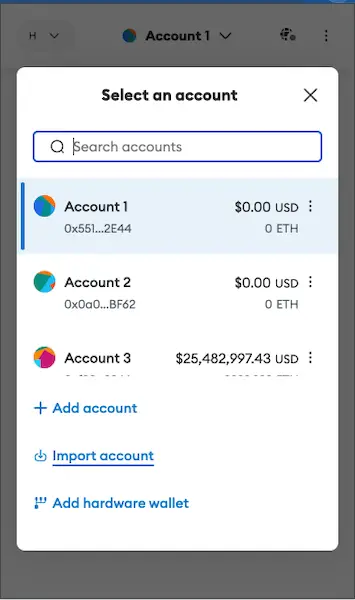
To do this, you need to import the private keys of the accounts displayed on the console into Metamask. For example, import the values of Private Key for Account #0 and #1.
Verification Scripts
Here, we develop two scripts for verification purposes. The target contract is the one implemented on day 17.
- fund.ts: A script to execute the
fundfunction. The account balance is reduced by the amount funded. - withdraw.ts: A script to execute the
withdrawfunction. It can only be executed by the owner who deployed the contract and can withdraw the entire balance of the contract.
fund.ts
// scripts/fund.ts
const { ethers, getNamedAccounts, deployments } = require("hardhat");

async function main() {
    const {user} = await getNamedAccounts()
    console.log(deployer)

    const funding = await ethers.getContract("Funding", user)
    const fundingAddress = await funding.getAddress()
    console.log(`Got contract Funding at ${fundingAddress}`)
    console.log("Funding contracct...")
    const txnResponse = await funding.fund({
        value: ethers.parseEther("1"),
    })
    await txnResponse.wait()
    console.log("Funded!")
}


main()
  .then(() => process.exit(0))
  .catch((error) => {
    console.error(error)
    process.exit(1)
})// scripts/fund.ts(excerpt)
const { user} = await getNamedAccounts()Similar to day 22, we use the imported getNamedAccounts function to retrieve account information set in hardhat.config.ts. This time, we will retrieve the ‘user’ account (set as the first in the account list).
// scripts/fund.ts(excerpt)
    const funding = await ethers.getContract("Funding", user)
    const fundingAddress = await funding.getAddress()
The getContract function takes two arguments: the contract name and the executing user. We retrieve an instance of the Funding contract, already deployed on day 22, to be executed by the user account. If you want to obtain the contract’s address, you can get it by executing getAddress from the retrieved contract variable funding.
// scripts/fund.ts(excerpt)
    const txnResponse = await funding.fund({
        value: ethers.parseEther("1"),
    })
    await txnResponse.wait()
From the retrieved contract instance (funding variable), you can call functions and members defined in the original smart contract. The fund function, as seen on day 17, is a function defined in Funding.sol.
Here, { value: ethers.parseEther("1") } specifies the amount of Ether sent to the fund function. In this code, 1 Ether is being sent to the fund function. The ethers.parseEther() function converts the amount of Ether into a BigNumber in Wei (the smallest unit of Ether).
txnResponse.wait() represents waiting for the transaction to be mined.
※ Although the fund function in Funding.sol does not define an argument, it is possible to specify the amount of money sent like this. In Solidity, variables such as msg.sender (sender) and msg.value (amount sent) are defined as global variables. Therefore, these variables do not need to be explicitly defined when defining a function.
// scripts/fund.ts(excerpt)
main()
  .then(() => process.exit(0))
  .catch((error) => {
    console.error(error)
    process.exit(1)
  })
This part of the code determines the process’s exit code depending on whether the main() function was successful or not.
main().then(() => process.exit(0)): This is executed when themain()function successfully concludes. Here, it returns an exit code of0. In shell scripts or command-line applications, an exit code of0signifies success.main().catch((error) => { console.error(error); process.exit(1); }): This is executed if the main() function throws an error for some reason. The error information is output to the console, after which the process exits with an exit code of1. An exit code of1generally indicates an error.
withdraw.ts
// scripts/withdraw.ts
import { error } from "console"

const { ethers, getNamedAccounts } = require("hardhat")

async function main() {
    const {deployer} = await getNamedAccounts()
    const funding = await ethers.getContract("Funding", deployer)
    const fundingAddress = await funding.getAddress()
    console.log(`Get contract funding at ${fundingAddress}`)
    console.log("Withdrawing from contract...")
    const txnResponse = await funding.withdraw()
    await txnResponse.wait()
    console.log("Got it back!")
}

main()
  .then(() => process.exit(0))
  .catch((error) => {
    console.log(error)
    process.exit(1)
  })
The code uses the same functions as in fund.ts. When executed, it uses the deployer account (the same as the owner who deployed the contract).
Executing the Verification Scripts
With the local network running, execute the scripts from the console in VS Code.
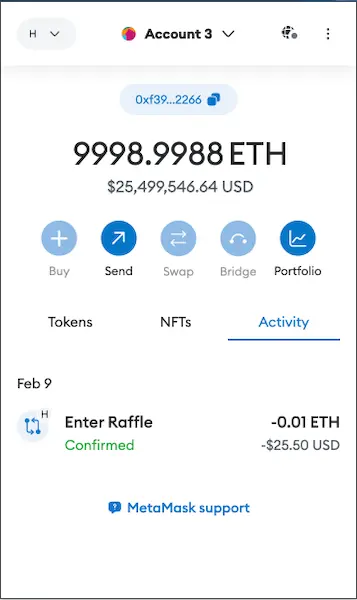
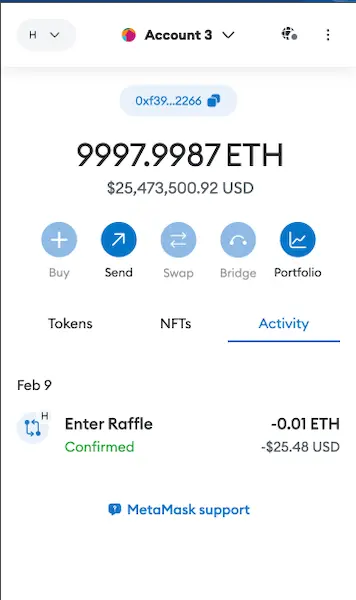
- Execute fund.ts (1 ETH is transferred to the contract from the user (Account #1)).
Check that the balance of Account #1 has decreased (compare the balance in Metamask before and after execution). - Execute withdraw.ts (the contract balance is withdrawn by the deployer (Account #0)).
Check that the balance of Account #0 has increased (compare the balance in Metamask before and after execution).
Scripts can be executed in the following format. Specify the script name following run, and specify the network name following the network option. Since the execution is on the local network, specify localhost.
yarn hardhat run scripts/withdraw.ts --network localhostBelow is an example of executing fund.ts.



Comments