As we begin development with Hardhat, we will deepen our understanding of the development tools and environment used and actually set up the environment.
Tools and Environment
The following diagram illustrates the overview of tools and environment.
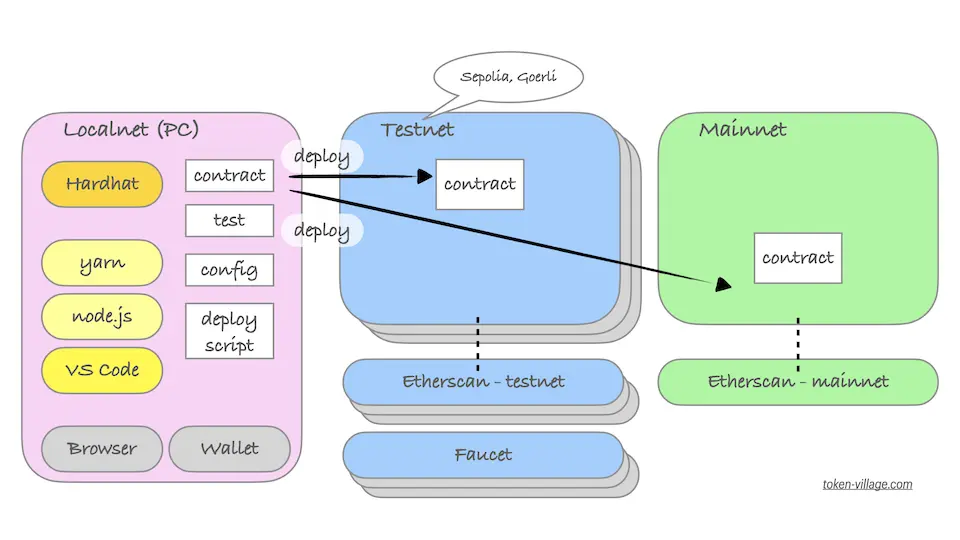
As mentioned on Day 4, the Ethereum network consists of two main networks: the testnet and the mainnet, in addition to the local network for local development. The local network operates in an environment within the PC (an enclosed environment on the PC), where a virtual blockchain network is provided by Hardhat.
- Local Network: A network provided by the framework (Hardhat) that operates on the local PC. Testnet: Ethereum’s official test network, an environment where production-equivalent checks are possible.
- Testnet virtual currency can be obtained through a service called Faucet. Currently valid testnets in 2023 include Sepolia Net and Goerli Net. Each testnet has its own version of Etherscan, allowing for the verification of transaction and contract details (details about Faucet and Etherscan are mentioned in Day 5).
- Mainnet: Ethereum’s production network. To obtain real Ether, you use an exchange service and convert real currency, such as Japanese Yen. There is an Etherscan for the mainnet, which allows you to check transaction and contract details in the production environment.
As explained on Day 5, to connect to dApps (decentralized applications) and use various services, you use wallet software. In a local environment, this means installing browsers (Chrome, Brave, etc.) and browser plugins like Metamask, enabling these services (i.e., interaction with the blockchain network). Wallets are frequently used in development for interactions, so they can also be considered development tools.
Other software used in development includes:
- VS Code: An integrated tool (known as IDE) for coding, debugging, testing, and other development activities.
- node.js: A runtime environment for JavaScript (an environment to run JavaScript programs).
- yarn (npm): JavaScript package management software. Used for installing and managing support software and libraries during development. Operates on Node.js. Npm has similar functionality, but Yarn, being more refined, is used instead.
- hardhat: A framework for smart contract development, using JavaScript/TypeScript for everything other than contracts. Refer to Day 18.
Setup
We will sequentially introduce the development tools mentioned in the previous section. This guide assumes macOS, but it’s possible to set up the environment on Linux and Windows as well.
Installing Visual Studio Code (VS Code)
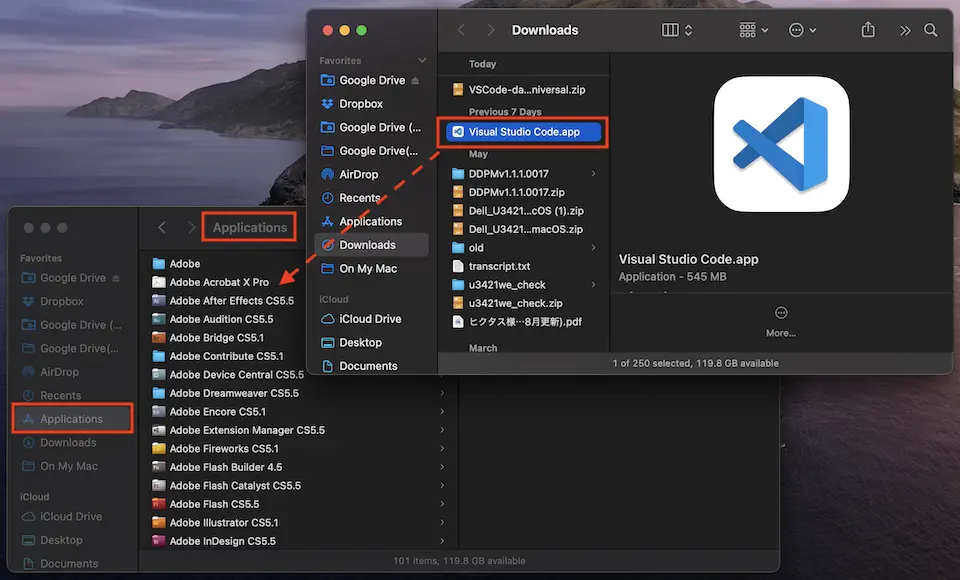
Download VS Code from Microsoft’s product page and unzip it. Drag and drop the unzipped app into the Applications folder.
VS Code: Adding Plugins
VS Code has extensions, allowing developers to customize their editor according to their needs and preferences. There are functions for supporting various languages, auto-completion, and debugging support, which can enhance development efficiency.
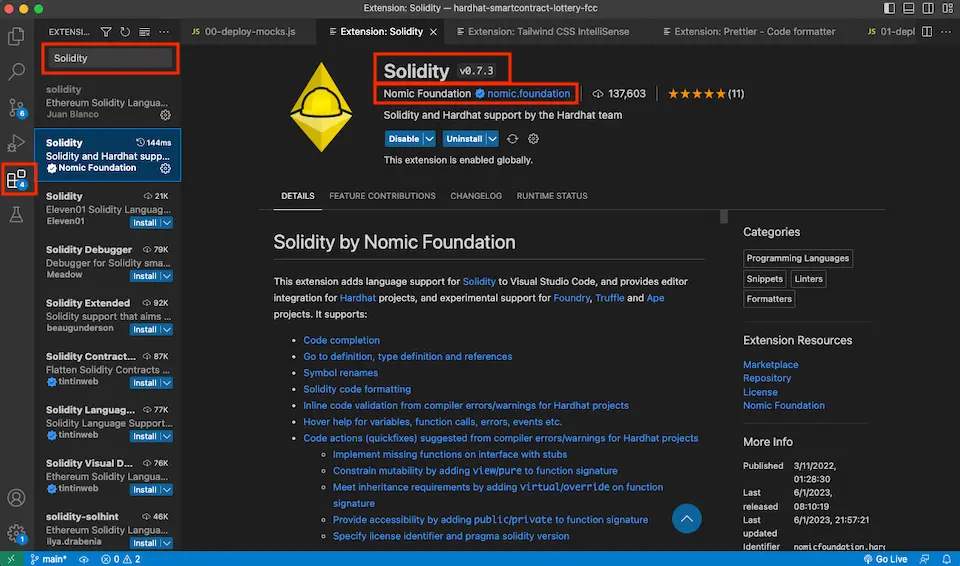
The plugins to be used in the following development are as follows.
- Solidity (Nomic Foundation)
- Prettier – Code formatter (prettier.io)
- Tailwind CSS IntelliSense (Tailwind Labs)
Adding plugins can be done by going to the Extensions icon in the far left icon menu > Entering keywords in the search window > Selecting the relevant plugin > Pressing the Install button.
VS Code: Format Settings
VS Code has a feature called Command Palette (the search window inside the red frame in the following image), where you can instantly call up VS Code functions by entering text into the search window (accessible by hovering over it or pressing ⌘ + Shift + P). The following content might seem a bit difficult, but think of it as casting a spell.
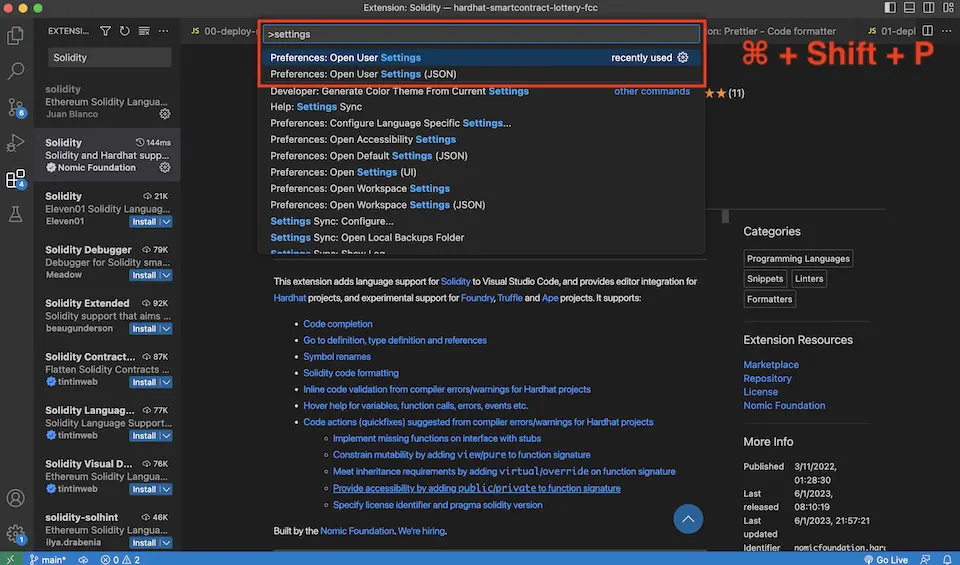
Type “Settings” into the Command Palette, and among the suggestions, sequentially select “Preferences: Open User Settings (JSON)” and “Preferences: Open User Settings,” and make format settings for each.
Preferences: Open User Settings (JSON): Enter the following three settings (to specify the library for formatting).
{
  ...
  "[solidity]": {
    "editor.defaultFormatter": "NomicFoundation.hardhat-solidity"
  },
  "[javascript]": {
    "editor.defaultFormatter": "esbenp.prettier-vscode"
  },
  ...
  "editor.defaultFormatter": "esbenp.prettier-vscode",
...
}
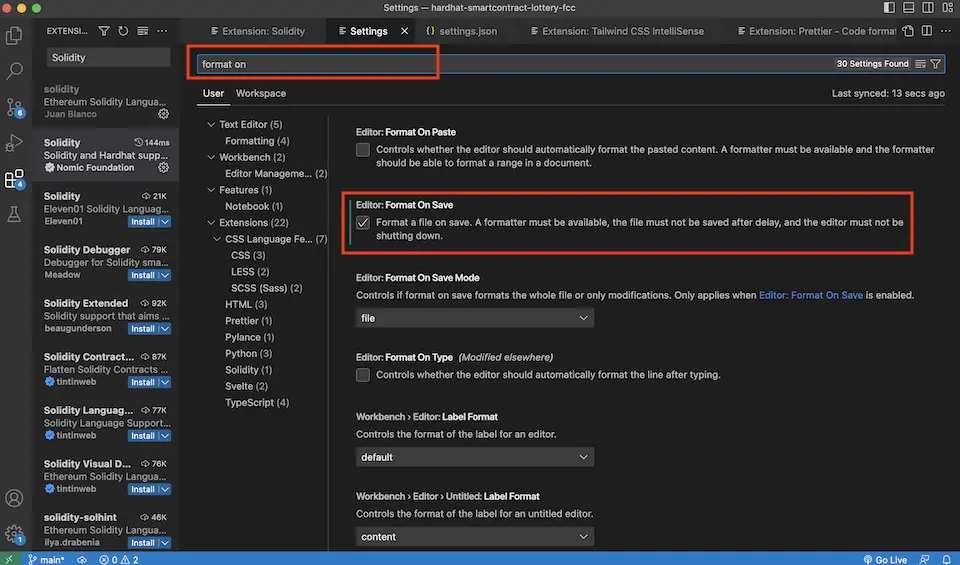
Preferences: Open User Settings: Enter “format” in the search window, search, and check “Editor: Format On Save” (formats the code into a more readable form every time you save).
Installing Node.js
Download and install Node.js from the official website, or you can install it using Homebrew, a package manager for macOS, via the command line.
Open Terminal (Applications > Utilities > Terminal) and install Homebrew using the command provided on the official website.
/bin/bash -c "$(curl -fsSL https://raw.githubusercontent.com/Homebrew/install/HEAD/install.sh)"Once the installation is complete, the brew command will be available.
brew install nodeAfter a successful installation, the node command will become available (if the node command does not appear at this stage, there may be an issue with the directory path where the command is located).
brew install gitInstall git for source control management. The details are omitted here, but with git, you can create a repository on GitHub (a place to store the source code) and manage your source code remotely or locally.
Installing Yarn
When you install Node.js, the default package manager npm will also be installed. Use npm to install Yarn.
npm install -g yarnThis will make Yarn available. Try running the following command to see the version displayed.
yarn -vWith this, the basic setup is complete. Setting up Hardhat is necessary for each individual project separately, so it will be addressed separately (this guide covers the setup needed commonly across all projects, which is the global setup).






Comments